

🚀 What is OAuth?#
OAuth is a secure way to let your application access user data without asking for their password. Think of it like giving a hotel key card - you get access to specific rooms (permissions) without sharing your master key (password).
🏗️ Step 1: Create Your OAuth Client#
Before you can use OAuth, you need to create an OAuth client in your dashboard. This gives you the credentials needed to authenticate.
- Go to OAuth Client Management (Advanced) in your dashboard
- Click the "Create New OAuth Client" button
- Fill in the required information:
- Client Name: Give your application a descriptive name (e.g., "My Application")
- Redirect URI: Where users will be sent after they authorize your app (e.g.,
https://app.aisync.link/test/callback) - Confidential Client: Check this box if your app can securely store secrets (recommended for server-side apps)
- Click "Create Client"
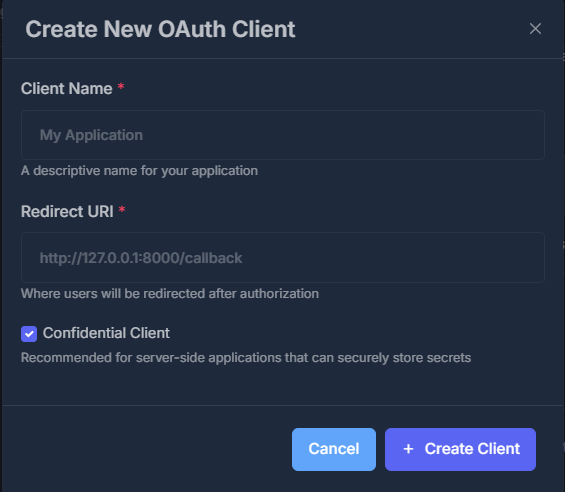
The Redirect URI must exactly match what you use in your authorization requests. Make sure it's the full URL including the protocol (http:// or https://).
🔑 Step 2: Get Your Credentials#
After creating your OAuth client, you'll see it in the client management table with:
- Client Name: The name you gave your application
- Client ID: Your unique client identifier (you'll need this)
- Client Secret: Your secret key (keep this secure!)
- Redirect URI: The callback URL you registered
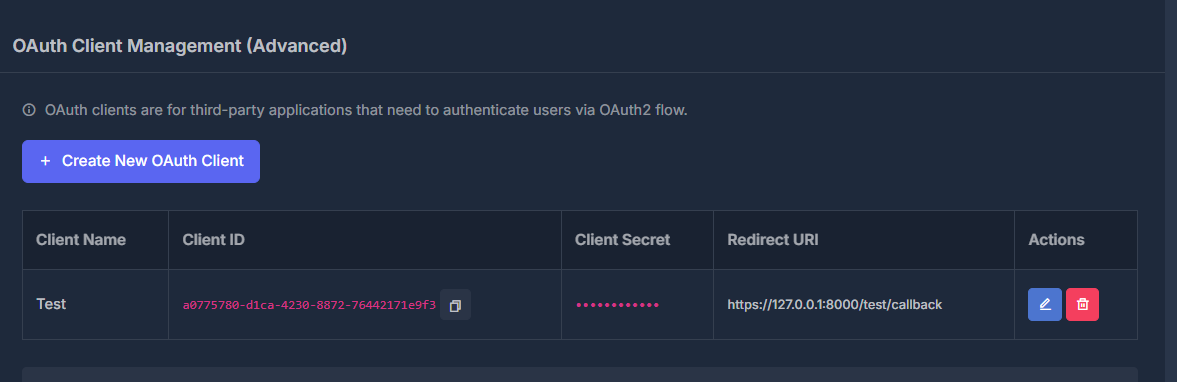
Never share your Client Secret publicly! It's like a password - keep it secure and never commit it to version control.
🔄 Step 3: The OAuth Flow#
Once you have your Client ID and Client Secret, follow this flow:
1️⃣ Authorize (Get Permission)#
Send users to the authorization endpoint with your Client ID. They'll grant permission to your app.
https://app.aisync.link/login/oauth/authorize?client_id={{client_id}}&redirect_uri={{redirect_uri}}&response_type=code&scope=*' 2️⃣ Get Authorization Code#
After the user authorizes, they'll be redirected back to your Redirect URI with a code:
YOUR_REDIRECT_URI?code=AUTHORIZATION_CODE
3️⃣ Exchange Code for Token#
Use the authorization code to get an access token:
POST /oauth/token4️⃣ Use Your Access Token#
Now you can make API calls using the access token:
Authorization: Bearer YOUR_ACCESS_TOKEN🧩 Understanding Your Credentials#
🆔 Client ID#
- What it is: A public identifier for your application
- Where to find it: In the OAuth Client Management table
- Is it secret?: No, it's safe to include in your frontend code
🤫 Client Secret#
- What it is: A private key that proves your app's identity
- Where to find it: In the OAuth Client Management table
- Is it secret?: Yes! Never expose this publicly
🔁 Redirect URI#
- What it is: The URL where users are sent after authorization
- Important: Must exactly match what you registered
- Example:
http://127.0.0.1:8000/callbackorhttps://yourapp.com/callback
🔐 Personal Access Tokens#
Personal Access Tokens provide a simpler alternative to the OAuth flow. They're like passwords for your API - you can use them immediately without going through the OAuth authorization process.
🆕 Creating a personal token
- Click the "Create New Personal Token" button

- Fill in the token details:
- Token Name: Give your token a descriptive name (e.g., "Test Package")
- Token Expiration: Choose between:
- Never Expire: Token works indefinitely
- Custom Expiration Date: Set a specific expiration date
- Scopes (Permissions): Select the permissions you need:
- Full Access (*): All permissions
- Or uncheck and select specific scopes
- Click "Create Token"
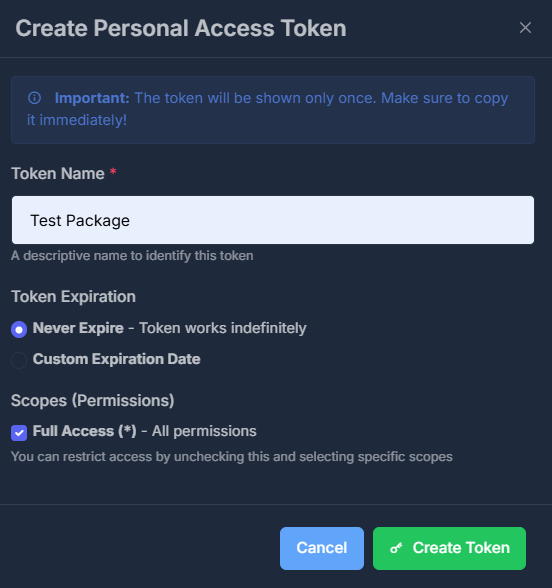
Important: The token will be shown only once. Make sure to copy it immediately! For security reasons, it won't be shown again.
After creating the token, you'll see a confirmation dialog with your new token. Copy it immediately:
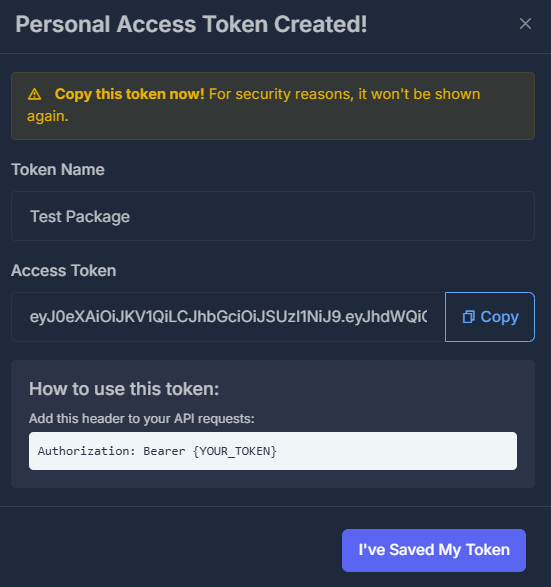
🔧 Using Your Personal Access Token
Once you have your personal access token, use it in the Authorization header of your API requests:
Authorization: Bearer YOUR_PERSONAL_ACCESS_TOKEN🗂️ Managing Personal Access Tokens#
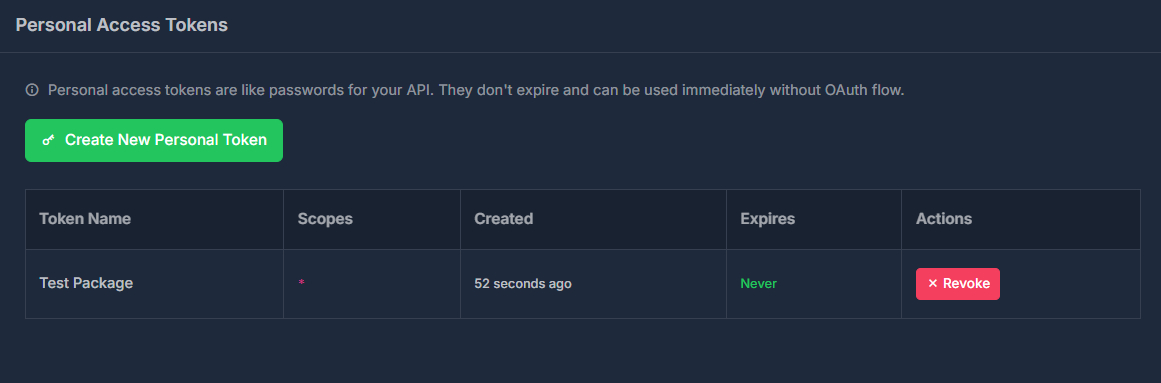
In the Personal Access Tokens table, you can see:
- Token Name: The name you gave your token
- Scopes: The permissions associated with the token
- Created: When the token was generated
- Expires: Expiration status (or "Never" if it doesn't expire)
- Actions: Revoke the token if needed
Personal Access Tokens are ideal for personal use, testing, or server-to-server communication where OAuth flow isn't necessary. For production applications with multiple users, use the OAuth flow instead.
⏭️ Next Steps#
Now that you understand the basics, check out these endpoints: